Conditions for the installation of Winamaz :
For the LITE license, you must have an Amazon account and access to the API. For new accounts, access to the API is unlocked by Amazon after the 3rd sale
For the FULL version, you must have at least one validated account on one or more of the affiliate platforms available. The site concerned by the installation of Winamaz must be validated on the platform(s) concerned (otherwise you will earn commission on any sales). Finally, you must be registered with your targeted partner programs (Cdiscount, Boulanger, Fnac, RDC, etc.). Winamaz Full can be activated without an Amazon account but if you want to also present Amazon products, you must have an Amazon affiliate account AND access to their API.
Before you start installing Winamaz, we recommend that you check the minimum system requirements. You will find it on this page. Indeed, a PHP version that is too old can cause bugs.
Step 1: Download Winamaz
After the validation of your payment, you will receive your license number by email. You will have to download the latest version of Winamaz from the “your account” page on the Winamaz.com website
Step 2: Upload the plugin on your WordPress website
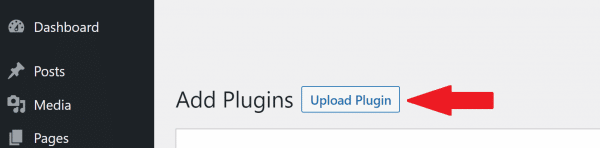
Go to the WordPress back office in the “Plugins” section. Click on Add New.

Click on Upload Plugin.
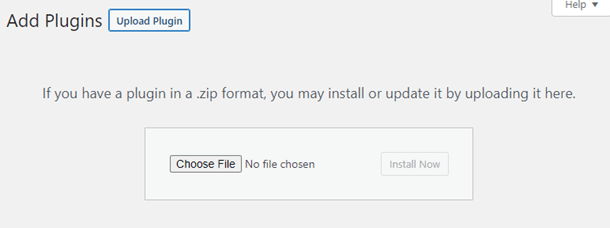
Click on Choose File and select the Winamaz zip folder. Then click on Install Now.
**If you have difficulties installing the Winamaz plug-in on WordPress, you can try using your usual ftp client. You will have to put the Winamaz folder (unzipped) in the “Plugins” folder of your WordPress installation. The path should look like this: /wp-content/plugins. We only recommend this method as a last resort and advise you to use the procedure described above.**
Step 3: Activate Winamaz
Go back on the “Plugins” section. Look for the Winamaz plugin and click on Activate.

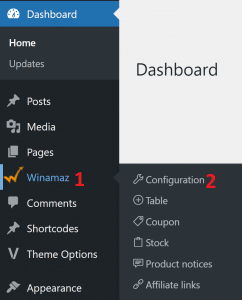
In the WordPress administration menu, click on Winamaz and then on Configuration to start the configuration.
Go to the “Activation” tab and enter the following information:
- Your email address (the one used for the Winamaz payment)
- The password you used to create your account
- The license key you received by email after your purchase
- Click on “Activate the plugin”
Step 4: Connect Winamaz and Amazon
Attention : Avec la nouvelle API amazon, votre ID tracking doit impérativement être lié à votre clé API.
- Go to the Winamaz back office in the “Amazon API” sectionCopiez/collez la clé secrète (attention à ne pas avoir d’espace avant ou après la clé)
- Copy/paste your API key (be careful not to leave any spaces before or after the key)
- Copy/paste the secret key (be careful not to leave any spaces before or after the key)
- Copy/paste your main tracking ID from your site
- Click on “Save” and wait while Winamaz tests the connection to Amazon
If the validation is successful, proceed to the next step. If the validation fails, please read this.
Step 5: Configure the Settings
Winamaz offers you many options allowing you to set up its use and design according to the needs of each of your sites. In order to customize Winamaz, you have to configure the “Plugin settings” tab.
Important note: from version 1.4.1 a new parameter “Amazon partnership declaration” has been added.
Step 6: Customize Winamaz with yours colors
Winamaz is fully customizable to the colors of your site without the need for CSS knowledge. Go to the “Customization” tab
The first part allows you to change the colors of the different Winamaz templates, the text of the buttons or the size of the thumbnails.
The second part allows you to customize the colors of the Winamaz tables.
The last part allows you to add your own Custom CSS to fully customize Winamaz. To take it into account, remember to “Activate” the custom CSS 🙂
Step 7: Install your first shortcode
Go to a page or a post in the WordPress back-office : you will find our Winamaz shortcode generator that is very useful!
The main shortcodes are in use on our Demo page.
Previously using AAWP and want to speed up the replacement of shortcodes on your sites? Read this 🙂